Follow these steps if your company allows you to reset your password:
1. Navigate to the URL where you access SAM.
2. On the login page, select ‘I forgot my password’.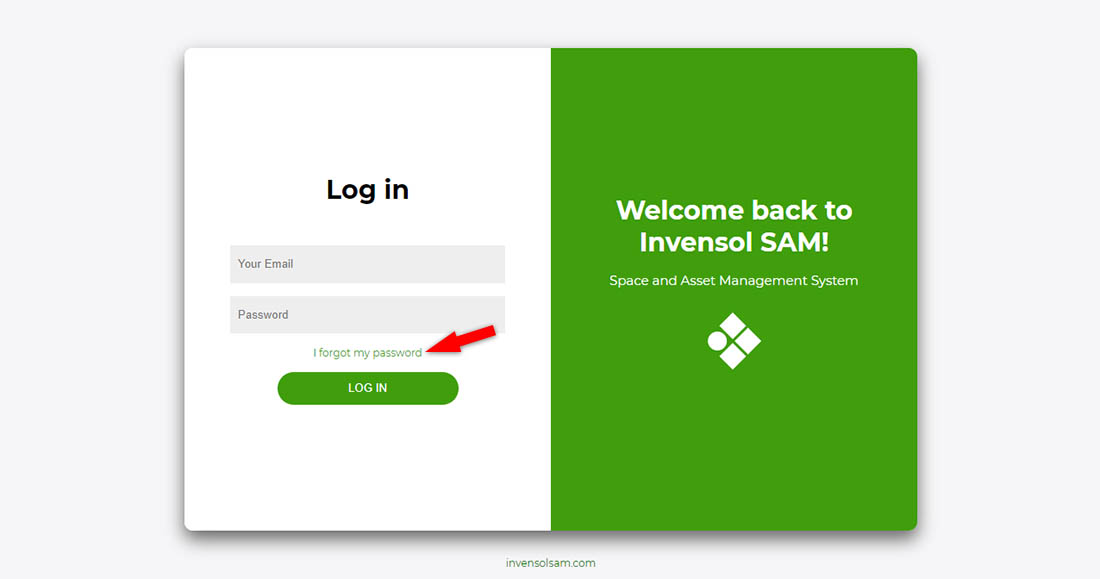
3. Type your email address (or user name + email address depending on site settings).
4. Select ‘Reset password’.
After you submit your information, you can create a new password based on the instructions and a temporary password you receive in an email. Your temporary password remains active until you change it. If you can’t access the *Forgot Password* option, contact your company’s local SAM Administrator. If you don’t know how to contact your local SAM admin, just click on the /”Support” link on the bottom of the login page.
Log in to change your password. Access the menu in the right side of the page header *Profile Page*. Passwords are case sensitive, must not contain spaces, and must be at least 8 characters long. Passwords can contain a maximum of 32 characters.
Tip: We recommend that you change your password periodically to ensure security. Don’t use common personal information for your password, such as your name.
Make sure that you are logging in with the right email (or username) and password. If your account is set to inactive by your Local SAM Admin, the system will not let you log in. Make sure you have an active SAM account by contacting your Local SAM Admin!
SAM will automatically choose a language based on your browser’s settings. If you wish to switch language manually, you can do it by clicking on the right side of the page header
(Globe icon)![]()
To set up your printer, follow your printer manufacturer’s instructions.
- Go to the Reports module.
- Choose **Print floorplan** on the Reports list.
- Select the floor to display it in the browser.
- Click **File** **Print**. Or, use a keyboard shortcut: – Windows & Linux: **Ctrl + p** – Mac: **⌘ + p**
- It the popup window, select the destination and choose any print settings you want.
- When ready, click **Print**.
SAM will automatically choose a language based on your browser’s settings. If you wish to switch language manually, you can do it by clicking on the right side of the page header (Globe icon)
No, you cannot. You are only able to book a desk in the Team Area(s) to which your Organizational Unit belongs. An Organizational unit can be assigned to multiple Team Areas, in this case, you will be able to book any Desk belonging to those team Areas.
The shortest timeframe you can book is half a day (AM until 13:00 or PM after 13:00). You can book a morning/ afternoon shift or an entire day (clicking the centre) or an entire week (clicking the left side box).
No. Regular users can only book one Desk at one timeframe and can cancel only his/her own booking. There are users with elevated permissions: e.g. Team Assistant users are able to book multiple desks under the same timeframe (e.g. for a visitor) or Reception users, they are able to book a desk in the entire building, or your colleague authorized to book a desk on your behalf.
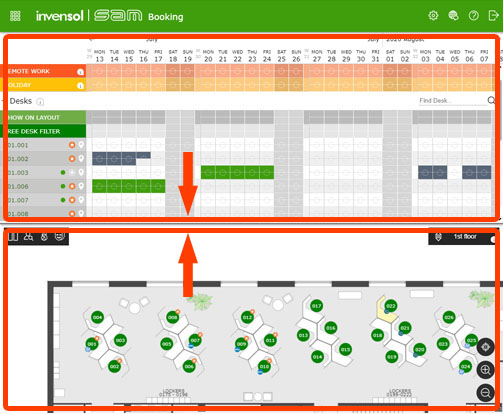
You can book a desk for yourself in the Desk List Table or in the Floorplan, which helps orientation. Using the mouse, you can navigate the floor plan like an online map.
On the Floorplan, only the green coloured desks are available for booking.
Favorite desks are marked with a star.
The desks marked with gray are not available for booking for you, because they belong to another Team Area, or they are not part of the Agile Working program (Permanent Desks).
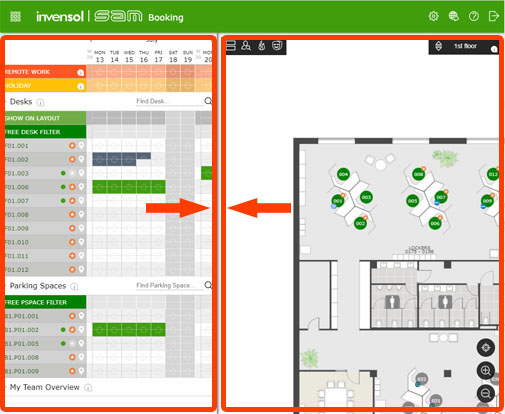
Use the Floor Navigator (top right corner) to switch between floors or buildings.

The Desk List does not automatically show each available desks. Instead, you can add any Desk to your list, whether on a permanent or temporary basis. Desks on a permanent basis are only shown in the list when you have added them to your favorites, or which you already have a booking on for the current date and time.
Tip: You should not keep more than 20-30 desks on your favourites list at the time, to keep the user interface at optimum speed.
If you hover the cursor over any desk on the floorplan, the Desk Menu will pop up.
You can add a Desk to your favorites, by clicking on the ‘Favstar’ icon in the Desk Menu. Favorite desks will remain visible on the list, even next time you log into the system. Your favorite Desks will be marked on the floorplan with a favorite star.
You can add any desks to the list temporarily from the floorplan with a single click, without adding them to your favorites. This helps you to find free places, in case none of your favorite desks are available. Next time you log in, or if you just refresh the page, you will only see the favourite workstations again, along with the previously booked desks for the actual time period.
You can search for desks by clicking on Search icon. Just type a desk number, or a part of it!
No, booking can be made for the current and the a couple of following weeks. It depends on your company preferences. On each Monday, another week becomes available for booking.
You can open colleague finder on the black floating toolbar. By entering the name of your colleagues there, you can find their booking locations, during the selected time period.
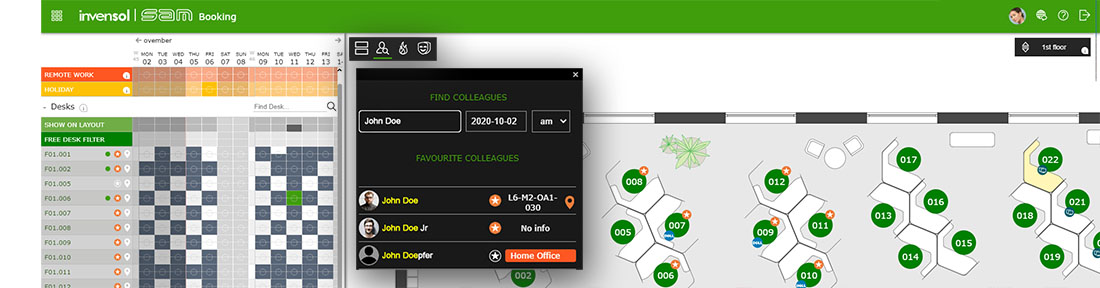
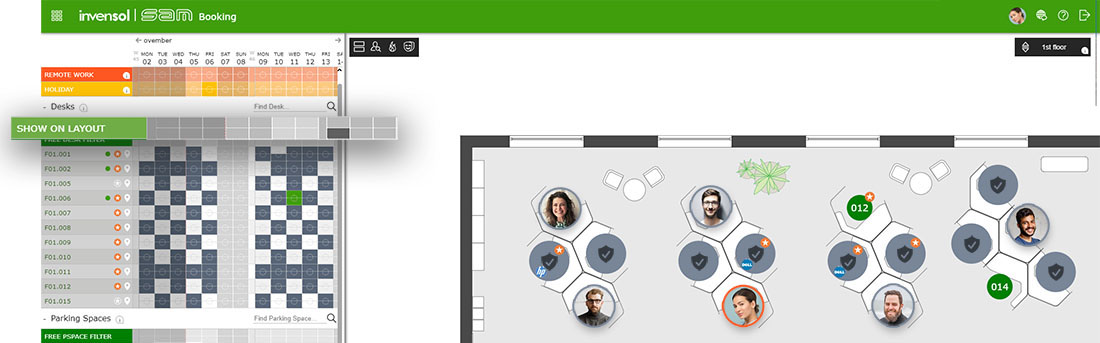
Or you can find your coworkers by using the floorplan. Click to ‘show on layout’ button and select the period.
Tip: By clicking on the star you can add colleagues to your favorites.
Sure. You can book desks on behalf of other person, if you are authorized by him/her. Or you can authorize other users in your organization unit to book on behalf of you. Open the On behalf toolbar by clicking on masks icon.
Or you can find your coworkers by using the floorplan. Click to ‘show on layout’ button and select the period.You can select your colleague you wish to book on behalf of. Only persons who authorized you to book on their behalf will be listed here. The person’s bookings will be displayed by blue color, and you can book him/her desks as you do it for yourself!
Make sure that he/she is in users in your organization unit.
You can mark the following activities : Holiday, Home Office, Travel, Meeting/Training. For some of these activities you might have a weekly or monthly days limit, that can be adjusted by your line manager.
Can I modify my bookings or remote work statuses for the past?
Here you can find information about the absence of your team members. Line Managers can set the day limit here to some of these activities, for each team member.


Workspace solutions to your office
Invensol SAM is a smart solution for managing your colleagues desks, devices, and spaces efficiently. It helps you create a flexible workspace that constantly adapts to your needs.